Feeds:
Posts
Comments

Noble Cowl

The problem with Christmas presents is that you can’t blog about them while you’re doing them, you rush to get them done and generally forget to take a decent picture, and in all honesty by the time you’ve finished them your sick of the sight of them and can’t be bothered to write anything whitty or insightful about the ‘creative process’ of their production.

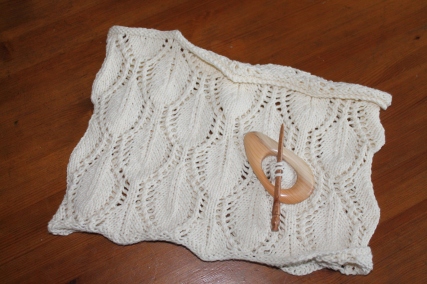
Anyway I made these cowls for Christmas for my Mum and Mark’s Mum and it’s actually a really nice pattern (it’s worked in the round so you don’t have to bugger about doing purl rows which I find annoying when doing lace work).

A noble cowl
I hesitate before saying this but I think it’s a nicely easy lace pattern. You can get into a good rhythm with it and it’s not too hard to memorise. Having said this I’ve done a few lace projects so I wouldn’t consider myself a beginner…i.e. don’t do this as your first lace project and then blame me when it becomes a complete mess.

Pretty pleased with the results and very pleased with the beautiful scarf pins that I bought from Tree Gems on Folksy (very quick delivery, nicely packaged etc…sells very cute buttons so go and have a look if you’re a knitter).


Catchy title no. Oooh it’s been a busy week and knackering week. Bea has been teething (fabulous fun) and has had a very runny nose so she’s been grumpy and tired all week.

The almond milk that I mentioned in my last post turned out really well. It’s super easy to make so if you fancy having a go take a look at this video I don’t have a nut bag, so I just used a muslin (find a friend with a baby…they’ll have tons of them they can give you…if not you can get them really cheaply at Ikea).

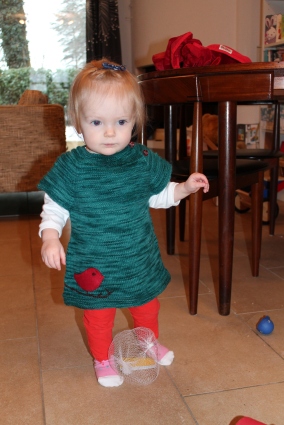
I’ve finished the Little Sister Dress that I’ve been working on for what seems like forever (although in fact I only started it at the beginning of January so it took just a few of days over a month).
Little Sister Dress
I decided that it was a little boring so embellished it with a felt bird and a little bit of embroidery. I’ve never done this with knitting before but I think it’s a really easy was to make something look a little more interesting and twee (and for me twee is always a good thing in relation to children’s clothing).

There are more pictures on my Ravelry page (linked to above). In all honesty this dress bored me to tears…rows and rows of stocking stitch in such a tiny yarn do not make me happy. Also I completely buggered up the pattern several times which is why the opening on the wrong side of the neck for some reason. Oh and I didn’t have quite enough yarn so had to rip the bottom back THREE TIMES before I managed to get it looking OK. Pleased with how it looks now though…sorry the picture is crap, too cold to go outside hence rubbishy indoor light.

The January baking challenge fell by the wayside, but fear not I haven’t forgotten it. My sour dough starter is on the side in the kitchen and I’m waiting for it to start bubbling away. I’m using the method described in the River Cottage Everyday, if anyone reading has had success (or not) with this then leave a comment and let me know as I’m really interested to see how it’ll turn out.

In other news it has been incredibly cold here. So here’s a couple of pictures to make all you Brits realise how warm it’s really been with you. Thankfully I’m told it’s going to heat up a bit this week…which is good because I’m beyond bored with being freezing cold and indoors.Ice sculpture Nyon 2012Ice in Nyon January 2012Nyon 2012 Ice
Makes me realise how lucky I am not to live in Siberia to be honest!

It’s really, really, really cold here and we’re all ill again. Great fun. I haven’t got any pictures to show you, which is a shame as apparently the ice means it’s very, very pretty down at the lake front (I wouldn’t know as I haven’t braved the cold).

The wedding we attended at the weekend was great fun and the food was fantabulous, which is particularly impressive given that it was catered by the brides and their friends (we copped out due to having a child with us). Again no pictures because I left my memory card at home.

I’ve signed up to the Whole Food Kitchen online workshop in an attempt to revamp my eating habits this year. I’m particularly keen to get some inspiration for lunchtimes and increase my veggie intake.I think it was just the impetus I needed as I’ve already made one recipe (a delicious kale, mushrooms and potato dish). I’ve also got some almonds soaking ready to make almond milk tomorrow morning (who knew youi could actually make it – not me!).

I’m also nearly ready to show you a little knitted dress (or it might be a tunic we’ll need to try it on before I know) but I have some finishing off to do. Anyway I’ll show you in the next couple of days assuming I can muster the energy to go out and buy buttons.

Until then keep warm everyone.

Where did January go?

Right well January went quickly didn’t it? I was full of good intentions, then Bea got ill, we had a house full of visitors and I just generally didn’t have much time for crafting and baking.

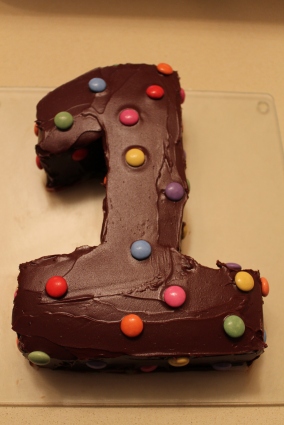
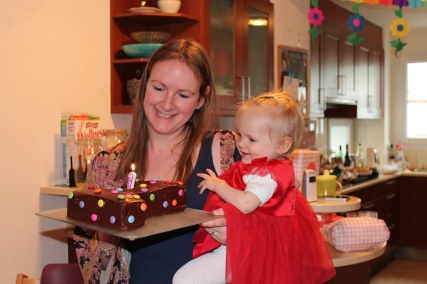
But yesterday was a certain little girls birthday and I did manage to make her a birthday cake for her first birthday party.

First birthday cake

A big thank you to those who lent me equipmemt for making and presenting the cake.

I used a recipe from Mary Berry’s Baking Bible (which I got for Christmas) for Death by Chocolate Cake. I’m not going to type out the recipe again as someone else has already done it. It was nice, but I still think this recipe is better (although expensive).

Lizzy and Bea

The Mary Berry cake was a good one for a kids birthday party (I didn’t make two layers, I just put the icing on the top). It was light and well risen but tasted a bit too golden syrupy for me.

Top tip from Kimberly Williams on how to get those number shaped cake tins to work when they don’t have a bottom on them. Stick them on a baking tray and put a large, heavy, casserole dish on top. Also do what I didn’t and put it face down so that the flat bottom of the cake on the baking tray becomes the top…as I said I didn’t do this, let’s hope I remember for the next time I make a number shaped cake.

Remarkably I appear to have nearly finished a knitted dress for Bea. Top tip people – don’t knit using 4-ply it takes forever and when knitting stocking stitch in the round it’s very very tedious. Hope to be back with photos of that after the weekend when I’ll also have pics of my first attempt at a eat immediately fruit cake.

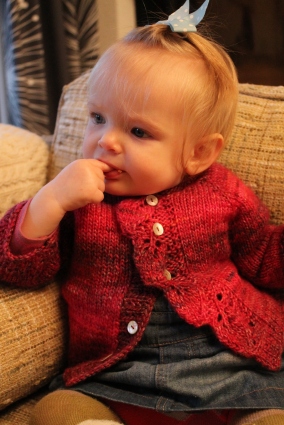
Ta da! Here is the cardigan blocked and with buttons…sadly the weather is terrible so the pictures aren’t great as there’s very little light in the house.

It uses a free pattern called Cascade by Raya Budrevich from Petite Purls (which seems to be some sort of knitting collective for little people patterns). It’s a seamless raglan style cardigan knitted on circular needles. Wow what a quick little knit this was! I should make everything out of worsted weight yarn.

Cascade by Petite Purls

The yarn is Art by Colinette in the Magenta colourway. I’m not normally a fan of varigated yarn as I think they look a big mental (check out the cardigan on the model for the Art yarn on the Colinette website and you’ll see what I mean) but I think you can get away with it for a baby/young child.

I knew it would look great as my Mum had kntted a wrap baby cardigan using the same yarn in a different colourway which was lovely. (My not so subtle admiration of the cardigan my Mum knitted worked as she also made one for Beatrix for Christmas – yay!).

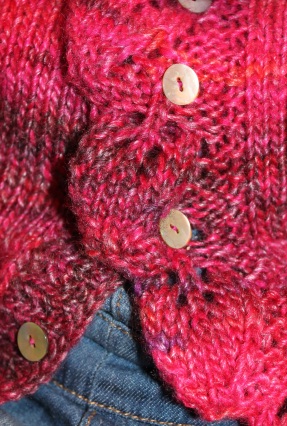
Leaf detail on Cascade by Petite Purls

Lovely yarn to work with, pattern was OK although I tried to use mods by Court and I have no idea if I actually managed to make them work or not. I think it looks better than if I’d followed the pattern. To be honest I think this cardigan looks better in the bigger sizes and in a none varigated yarn but I do like my finished item.

If you want to try this pattern then be aware that it comes up a little small…although this isn’t a problem when your baby./child is a little small too!

In other news I made a reindeer stew yesterday (it was half price at the supermarket). I can’t tell you what it tastes like because it’s in the freezer but I’m pretty sure it’ll be similar to venison. Leave me a comment if you’ve tried reindeer.

I’ve been a wowfully poor blogger of late…the fact that I couldn’t even remember my password and username for WordPress being a pretty good indication of my interest in blogging recently.

2012 is going to change all that, I have resolved to blog more frequently and I have lots of crafty plans. I’m proud to say that I’ve nearly finished my first cardigan of the year…go me! (We’ll overlook the fact that it’s for a one year old and worked in worsted weight yarn without seams for the time being shall we). And that I’ve washed and ironed the fabric to make my first ever quilt.

I’ve also decided that to encourage the blogging thing I’m going to undertake 12 baking challenges this year. Yes I am completely ripping off the Great British Bake Off but it’s inspired me, and I think that challenging yourself mentally is probably a good idea when you’re a stay at home mum with a strong inclination toward to eating rose and violet creams all day whilst watching reruns of Americans Next Top Model and Nanny 911.

So I haven’t finally decided on my challenges for this year but January is going to be sourdough bread and I’m going to attempt to make my own sourdough starter a la Hugh Fernley Whatshisname.

Will be back later in the week with pictures of aforementioned cardigan. Sorry no pictures on this but thought it better to actually publish something than procrastinate for two weeks and leave this post in draft.

Hello…

…I’m back again. The basic problem with this blog is that I don’t really have time to make anything to show you…which is something of an issue for a craft blog.
Anyway that to one side I do actually have a couple of things that have been finished for a while. I made this version of a taggie blanket in the week before Beatrix was born. I didn’t even know what a taggie was until I saw a little person with one at a playdate.

The aforementioned little person seemed to like it so I thought I’d buy one for my future baby. I looked online and was gobsmacked to find that they were about £13. Err it’s just a couple of pieces of material sewn together with some ribbon on the edge….I can make that for about 50p, I thought.

(Seriously the number of companies making money out of babies because people don’t have basic sewing skills is unbelievable….although obviously I also get that a lot of people don’t have the time/inclination to make this sort of stuff once the bambino arrives).

My version uses a cut down fat quarter from a print that Liberty did for the V&A quilting exhibition. This particular design is ‘Hearts’ in green, taken from a patchwork coverlet from the 1780s and 90s.
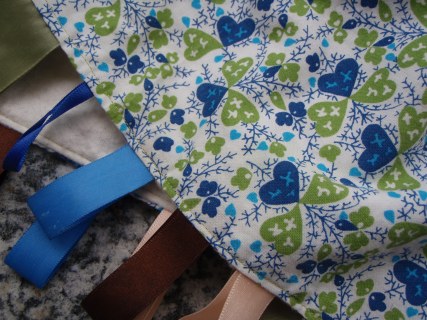
Taggie blanket

I’m sure many of you think that making a taggie blanket from such a nice piece of material is stupid but as I thought there was a chance it might be adopted and totted around for years I wanted something that I didn’t hate the look of.

(My sister had a beautiful handmade…and I mean handmade i.e. all sewn by hand not with a machine…cot quilt that she carried around with her, it’s now completely destroyed but I’m sure it looked super cute and incredibly tastful when she was tiny. I expect my Aunt hoped it would become a family heirloom, you should see it now it’s just little threads of material hanging together like a spider web. I adopted an unattractive stripy pillow case as my comfort blanket, my sister has always had considerably better taste than me).

It’s backed with a piece of soft flannel and the ribbons around the edge are just what I happened to have in my ribbon box that ‘went’ with the quilting fabric.
So as I didn’t buy anything specifically for this project I’m going to consider it free! Babies seem to love chewing and pulling at tags on anything and everything so this would make a great baby shower gift.

Bea with taggie blanket
The most time consuming part is pinning all the ribbon on. I found the best method was to cut all the ribbon to the same length, fold them in half and then pin them approximately one cm apart from one another. It definetly looks more professional if all the ribbons are around the same length.

I’ve used a variety of ribbons including some grosgrain ones. If I’d had some velvet ones in an appropriate colour I’d have added them as I think the different textures make it more interesting for a little person.

Hope to be back soon, even if it’s just with some work in progress photos. I’ve also started my Christmas presents which is a bit of a nightmare as how do you blog about those when the people you’re making stuff for read your blog? Mmm this is a long post, I need to become more succinct, thanks for reading to the end if you’re still here.
I haven’t blogged for a while because I’ve just completely got out of the habit. Anyway I have actually been making lots of nice things so hopefully I’ll get to show you some of them over the next week.

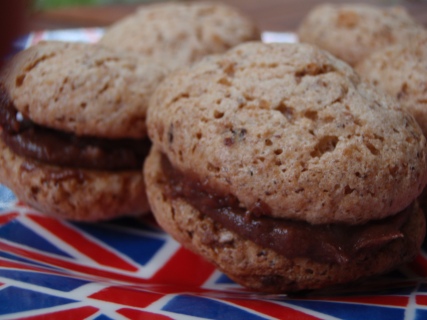
First up Hazelnut macaroons with a chocolate filling. I’m really pleased with these, the recipe is adapted from the original Pistachio Macaroons from Nigella Lawson’s How To Be A Domestic Goddess.
Hazlenut and chocolate macaroon
To be honest this is more of a sandwiched biscuit than a macaroon but I like them none the less.

Macaroons

75g ground hazelnut
125g icing sugar
2 large egg whites
15g caster sugar
Preheat oven to 180 degrees.

Filling
125g Softened butter
125g Icing sugar
1 tablespoon cocoa powder

Whisk the eggs until quite stiff, add the caster sugar and continue whisking until completely stiff (hold the bowl over your head, when it doesn’t fall on your head it’s stiff enough).

Mix the ground hazlenuts with the icing sugar, fold into the egg mixture.

Put into a piping bag and pipe about 30 circles using a 1cm nozzle. (Or just do what I did and pipe from the corner of a plastic freezer bag so you don’t have to wash up the piping bag).

Leave for 10 minutes to form a skin (not sure this really makes any difference but I’m not going to tempt fate and take the step out). Put in the oven for about 12 minutes.

While the macaroons are cooling make the filling.

Mix together 125g of softened butter with 125g of icing sugar and one tablespoon of cocoa powder.

Pipe the filling onto the flat side of a macaroon and squish another one on the other side…and your done. Alternatively just use a palette knife to put the filling on a macaroon.

These are really easy to make. I made the macaroons while Beatrix was in a baby carrier on my front, they baked while I put her down for a nap and I made the filling while they cooled.

Blog post and photography written during her nap – so I’m being completely serious when I say these are VERY simple.

And I leave you with a picture of the not so tiny anymore Beatrix!
Beatrix with headband

Scotch Eggs

This is a guest post from Mark (with a little help from Lizzy).

For the recent Royal Wedding party we went to I decided to make Scotch Eggs, I’ve wanted to make them for a long time as they’re always on the TV and they look tasty.

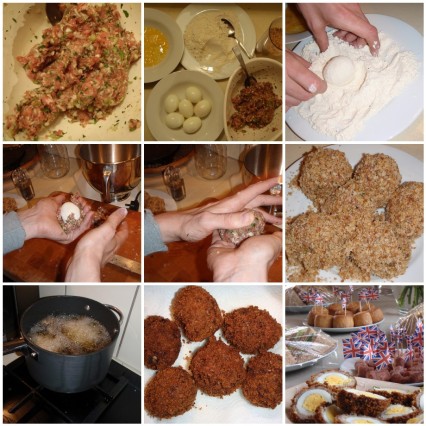
I wanted to make quails eggs but Lizzy said that it would be too difficult to adapt the recipe for the first time we did it. Just follow the recipe and you’ll have no trouble, here are some action shots to help you.

This is the recipe that I used, and here are some thoughts on how you can improve it.

1. You don’t need to flatten the sausage meat out on the board, just split it into equal portions and then squish it in your hand.
2. It would be considerably easier if you happened to own a deep fat fryer. (Lizzy – and it would be A LOT easier on the nerves of others living in the house)
3. The amount of flour and breadcrumbs suggested is ridonculous, you need half what they suggest, if that. (Lizzy – yes he said ridonculous not ridiculous).

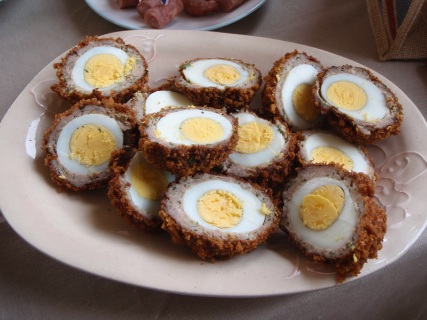
All in all it was a delicious and very satisfying man sized treat. Pork pies up next!
Mmmm tasty Scotch Eggs
Lizzy – And just in case you were wondering, Scotch Eggs are English (despite the name). They were invented by Fortnum and Mason (a very posh department store in London for those of you who are international readers) in 1738. I think they would make excellent picnic fodder.

A Mere Trifle

Sorry about the title of this post, I couldn’t resist. We celebrated the Royal wedding at the house of some friends (who did an amazing job of Britishing the whole thing up with bunting, union jacks, and bacon sandwiches). I decided to make a very British dessert, trifle, to take with me (which was actually an excuse to buy a new glass bowl from Ikea that I’ve had my eye on for some time).
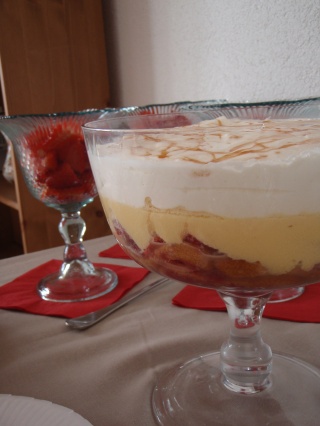
Raspberry and Lemon Trifle
I’m not sure if you get trifle in other countries but if you don’t know what it is it’s basically a layered dessert. First layer is sponge fingers with alcohol (or not) and a fruit sauce poured over the top to soak it, you can then add jelly (or jello if you’re American!) if you choose, then fruit, then a cold custard (that can be flavoured if you like), and whipped cream. My recipe then had caramel on the top but it’s more 1970s to add toasted flaked almonds, or coloured hundreds and thousands.

I don’t have much experience of trifle, my Mum doesn’t like it so it really didn’t feature in my youth. So I just googled lots of recipes and realised that there are A LOT of different ways of making tifle.

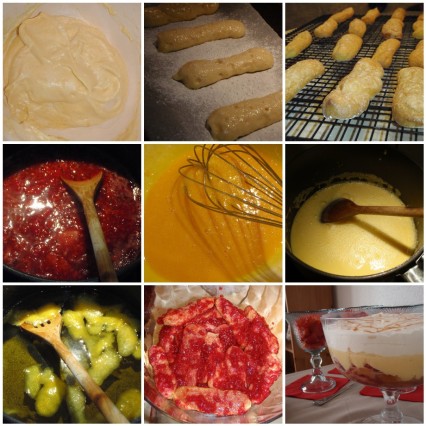
First I made a load of boudoir biscuits/sponge fingers using this recipe. That was super easy and very enjoyable, I like making anything that involves a piping bag. I’d say if you’re going to make these then try and make them at least an inch thick, you can do this by moving the piping bag more slowly. (Also I clearly didn’t get a ruler and mark the baking parchment – who would do this?).

I loosely followed this Raspberry and Lemongrass Trifle recipe by Nigella Lawson, but as I couldn’t find lemongrass in my local supermarkets (it’s a Swiss thing) I decided to use the zest from three lemons. It’s funny because the other day I nearly bought a lemon verbena plant and then I thought better of it ‘what on earth will I use lemon verbena for’ I thought. MMmmm lemon flavoured custard it turns out.
Trifle
I tweaked the Nigella recipe because I didn’t think it would have enough layers to fill my lovely glass bowl, so I added a layer of chopped strawberries. Strawberries were cheaper than raspberries which is why I opted for them.

Making the custard wasn’t as difficult as I thought it would be (although you have to watch it like a hawk, and I took my eye off it for a milli second and nearly lost the whole lot).

Apparently there’s a huge debate surrounding the absence or inclusion of jelly in trifle. As I said before I don’t have much experience of trifle but it seems that if you add jelly you’re ‘common’ – seriously who spends time thinking of these things! There’s an entire article about it here.
My trifle didn’t contain jelly (partially because it seems you can’t get jelly here and having made the sponge fingers and the custard I wasn’t about to start faffing around with gelatine) but what do you think? Should trifle contain jelly?

If I’d thought about this further in advance I’d have made the trifle before last weeks pavlova…because I’ve now got 8 egg whites sat in the freezer…oh well we’ll have to make another pavlova soon!

And as so many of you are asking, here’s a picture of Beatrix and I watching the wedding.

Lizzy and Bea dressed in red, white, and blue for the Royal Wedding